Adding an L-Footer Against Siberian Husky Digging
If you're reading this, chances are you've experienced that heart-sinking moment: you turn your back for a second, and your intelligent, independent Siberian Husky has either started a new excavation project in your yard or, worse, has completely vanished under the fence line. It's a frustrating, often terrifying reality for many Husky owners. This comprehensive guide is here to walk you through a highly effective solution to this persistent problem: installing an L-footer.
Understanding the Siberian Husky's Digging Instinct
Owning a Siberian Husky is an adventure, filled with boundless energy, striking beauty, and a personality that's truly one-of-a-kind. But let's be honest, it also comes with a unique set of challenges, and digging is high on that list. It’s not just a naughty habit; it's deeply ingrained in their very being.
The Ancient Roots of Husky Digging
To truly understand why your Siberian Husky views your meticulously maintained lawn as their personal archeological dig site, you have to look back to their origins. These dogs were developed by the nomadic Chukchi people in Siberia, where they lived in harsh, unforgiving environments. Digging wasn't a pastime; it was a survival skill. Picture this: blizzards raging, temperatures plummeting. What would a dog do? They’d dig a den. A simple hole in the snow provided vital shelter from the biting winds and cold. It offered a cozy, insulated spot to curl up and conserve body heat.
Beyond seeking warmth, digging was also essential for hunting and caching food. Small rodents, ground squirrels, and other critters would often burrow underground, and a Husky with an excellent sense of smell would follow suit, digging them out. This instinct for hunting and exploring is still very much alive today. When you see your Husky with dirt on their nose, they might be simply trying to catch that elusive mole or gopher that dared to trespass in their territory. The urge to dig is as natural to a Siberian Husky as their desire to run. It's a hardwired behavioral trait, not just boredom, though boredom certainly exacerbates it.
The Frustration of Persistent Digging
For us human companions, this innate behavior can be incredibly frustrating. You spend hours, maybe even days, perfecting your landscaping, planting your prize-winning petunias, or simply trying to maintain a neat yard, only for your Husky to transform it into a lunar landscape. Every new hole is a testament to their relentless determination and your dwindling patience. It’s not just about aesthetics; it's about safety.
The biggest concern, of course, is escape. A Husky can dig out of a yard astonishingly quickly. Their intelligence means they learn fast, and if they discover a weak spot under the fence, they'll exploit it repeatedly. A loose Husky is a Husky in danger. They might run into traffic, get lost, or even cause harm to themselves or others. You’ve likely heard the stories, or perhaps lived them yourself, of the frantic search for a vanished pet, the worry eating at you until they’re safely back home. For many, the mental toll of constantly worrying about a potential escape is exhausting. It leads to stress, property damage, and can even impact the quality of your relationship with your beloved pet because you’re constantly on guard. Preventing them from escaping is paramount, and addressing their digging at the fence line is step number one. For more insights on this common issue, check out Stopping a Siberian Husky From Escaping the Yard.
Beyond Escape: Other Reasons Huskies Dig
While escape is often the primary concern, Huskies dig for a variety of other reasons, too. Understanding these can help you address the root cause, or at least manage the behavior more effectively, in conjunction with physical barriers like an L-footer.
- Comfort and Temperature Regulation: Just as their ancestors dug snow dens for warmth, Huskies in warmer climates will dig shallow "cooling pits" in the dirt. These pits expose cooler earth beneath the topsoil, offering a refreshing spot to lie down and escape the heat. It's their natural air conditioning system. You might notice them doing this more often on hot days, or in sunny spots in your yard.
- Prey Drive and Scent Following: That incredibly strong prey drive, another ancestral trait, often leads them to dig. If a critter – a mouse, vole, squirrel, or even just a compelling scent – has burrowed under your lawn, your Husky will follow. They become singularly focused, turning over turf with an intensity that seems almost scientific. This is where you really see their working dog heritage shine through, even if it's inconvenient for your garden.
- Boredom and Pent-Up Energy: Huskies are intelligent, high-energy dogs. If they aren't getting enough physical exercise or mental stimulation, they'll find their own entertainment, and digging is a prime candidate. A bored Husky is a destructive Husky. They need outlets for their energy, whether it's long runs, interactive toys, or training sessions. Without these, your yard becomes their canvas for mischief. Think about it – if you were confined to the same space day in and day out with nothing to do, wouldn't you find a way to redecorate?
- Burying Treasures: Sometimes, the digging isn't about escape or comfort, but about hiding a valued possession. A favorite bone, a chew toy, or even an especially tasty treat from brands like Chewy, might be deemed worthy of burial for later enjoyment. It's an instinctive behavior, a way to keep their treasures safe from perceived rivals (even if those rivals are just you or another pet).
Understanding these motivations is key to approaching the problem holistically. While an L-footer addresses the opportunity for digging out, fulfilling your Husky's needs for exercise, mental engagement, and comfort can reduce the desire to dig in the first place.
What is an L-Footer and How Does It Work?
You've heard the term, but what exactly is an L-footer, and how does this seemingly simple addition to your fence manage to outsmart such a clever and determined digger? Let's break it down.
Defining the Anti-Digging Barrier
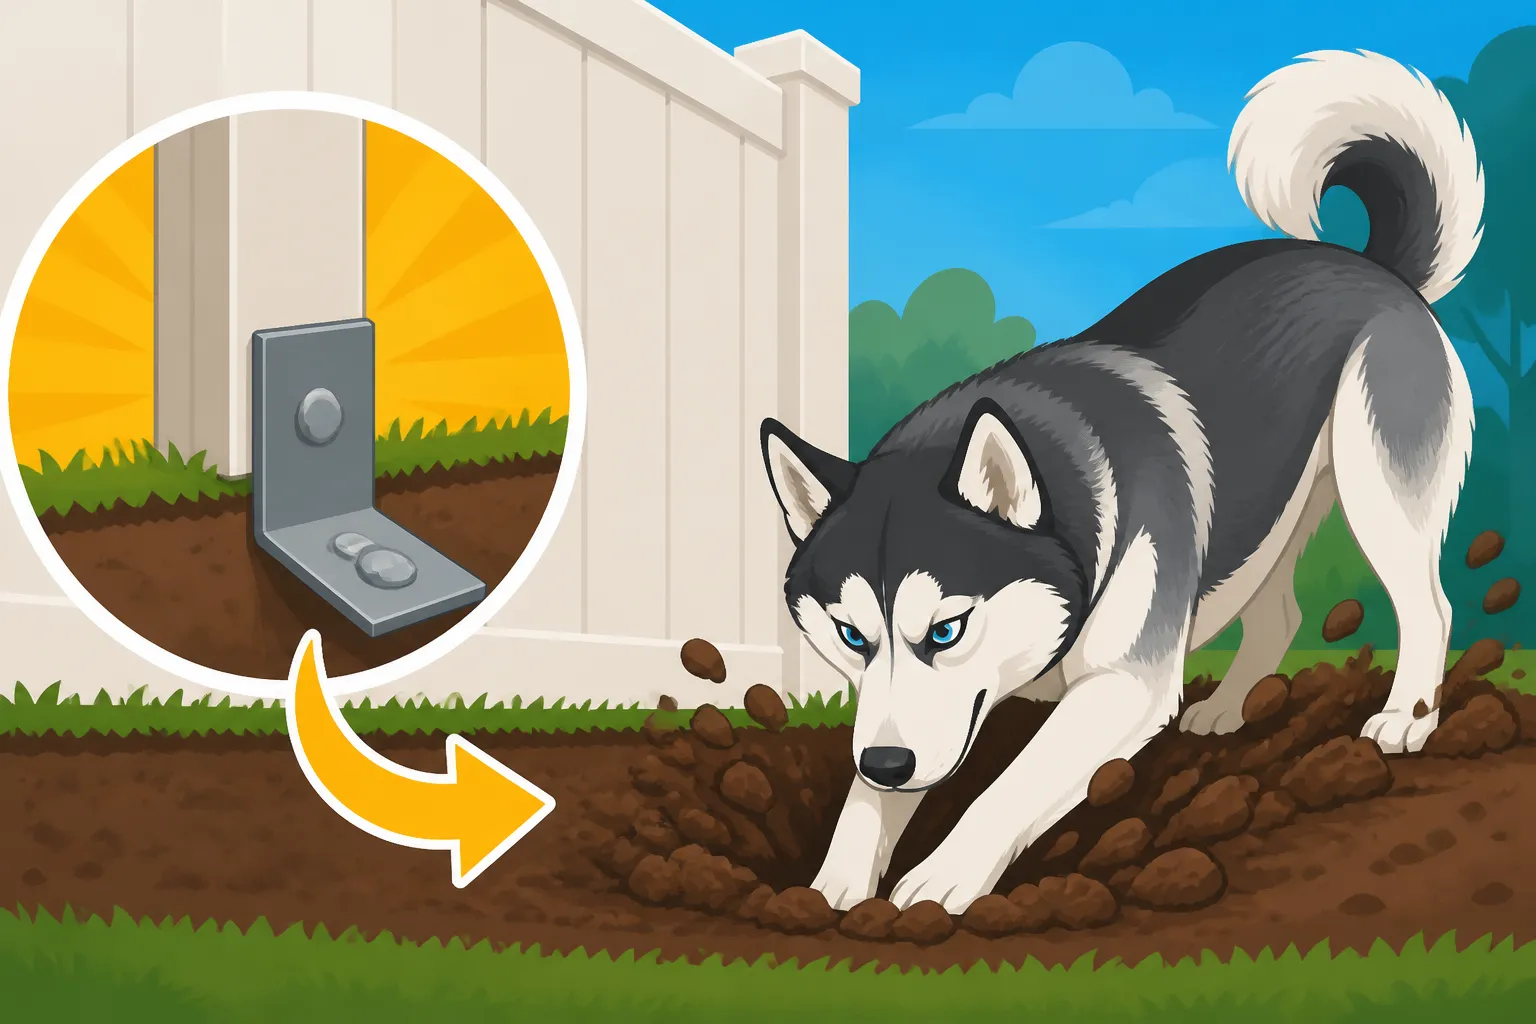
At its core, an L-footer is a barrier installed at the base of your existing fence, designed specifically to prevent dogs from digging underneath it. The "L" shape is crucial to its effectiveness. Imagine an 'L' lying on its side, with the vertical part extending down into the ground and the horizontal part extending outwards, parallel to the ground surface, away from the fence line.
Typically, an L-footer consists of durable wire mesh, though other materials like concrete or even sturdy landscaping timbers can be used. The wire mesh is often chosen for its ease of installation, flexibility, and affordability. Heavy-gauge welded wire or galvanized hardware cloth are popular choices because they are difficult for a Husky to chew through and resist rust. This mesh is anchored securely to the bottom of your fence, then buried. The exact dimensions can vary, but generally, the vertical section goes down at least 12-18 inches, and the horizontal "L" extends out 18-24 inches. The key is that the "L" section needs to be wide enough that your Husky cannot dig beyond it before hitting the barrier. For more on various fence enhancements, consider reading Burying Fence Wire Against a Digging Siberian Husky.
The Psychology Behind Its Effectiveness
The brilliance of the L-footer lies in how it thwarts a dog's natural digging process. When a dog attempts to dig under a fence, they typically start digging down and then out at an angle. They expect to hit soft dirt that gives way. When they encounter the buried, horizontal "L" section of the footer, it stops them cold.
Here's the psychological trick:
- Unexpected Obstruction: The dog digs down, expecting to burrow under. Instead, their paws hit a solid, unyielding barrier just below the surface. This is unexpected.
- Directional Confusion: To get past the L-footer, the dog would have to change their digging angle entirely, digging straight down several feet to get under the horizontal mesh, which is unnatural and far more effort. Most dogs simply don't think to do this. Their instinct is to dig out from the base of the fence, not straight down into infinity.
- Perceived Impossibility: The mesh creates a "false bottom" in the digging trajectory. After a few attempts, the dog perceives that the fence "goes too deep" to dig under, even though the actual depth might only be 18 inches. The horizontal extension makes them believe they can't get past it.
- Frustration and Deterrence: Repeatedly hitting this barrier without making progress becomes frustrating and unrewarding. Most Huskies will eventually give up on that spot and either try another, or ideally, stop trying to dig out of the enclosure altogether.
This clever design exploits their natural digging patterns, turning their own efforts against them. It’s a silent, constant deterrent that works even when you're not there to supervise.
Comparing L-Footers to Other Digging Solutions
While L-footers are incredibly effective, they aren't the only solution for a digging Husky. It's helpful to compare them to understand why they're often the preferred choice.
| Feature / Solution | L-Footer (Buried Mesh) | Underground Electronic Fence (Invisible Fence) | Concrete/Solid Footer | Large Rocks/Pavers at Base |
|---|---|---|---|---|
| Effectiveness for Digging | Highly effective; physically blocks digging trajectory | Ineffective for digging; only deters crossing a boundary | Highly effective; permanent physical barrier | Moderately effective; can be moved or dug around |
| Escape Prevention | Excellent for digging escapes | Poor; motivated Huskies will "take the static" and run | Excellent for digging escapes | Poor for determined diggers |
| Cost | Moderate (materials + labor) | Moderate to high (installation, receiver collars, batteries) | High (materials, professional installation often required) | Low to moderate (materials, labor) |
| Installation Difficulty | Moderate (requires digging, securing) | Moderate (requires trenching for wire, training time) | High (heavy materials, specialized tools) | Low (placing rocks) |
| Maintenance | Low (occasional inspection for damage/heaving) | Moderate to high (battery replacement, system checks, wire breaks) | Very low (highly durable) | High (re-positioning, weed control) |
| Aesthetics | Minimal impact; mostly buried | Invisible | Can be noticeable, depending on design | Can look messy if not well-placed |
| Safety for Dog | High (physical barrier, no shock) | Low (can cause stress, pain, potential for "running through") | High (physical barrier) | Moderate (can cause paw injury if sharp edges) |
As you can see, solutions like invisible fences are notoriously unreliable for Huskies. Their high pain tolerance and strong drive to roam mean they'll often endure the static shock to escape, as discussed in Why Underground Fencing Fails on a Siberian Husky. Large rocks or pavers can deter some casual digging, but a truly determined Husky will simply move them or dig around them. Concrete footers are exceptionally durable but come with a much higher cost and more intensive installation. The L-footer offers an excellent balance of effectiveness, cost, and relative ease of installation, making it a stellar choice for most Husky owners battling digging woes.
Planning Your L-Footer Project
Before you grab your shovel and start digging, a little planning goes a long way. This isn't a job you want to rush, especially with a dog as clever as a Husky. Thinking through the details now will save you headaches (and potentially re-digging) later.
Choosing the Right Materials
The success and longevity of your L-footer heavily depend on the materials you choose. You want something durable, resistant to both your Husky's efforts and the elements, and ideally, something that won't break the bank.
- Wire Mesh (Most Common and Recommended):
- Galvanized Welded Wire: This is a top choice. It's strong, resisting bending and chewing, and the galvanization process helps prevent rust, ensuring it lasts for years underground. Look for a gauge of 14 or 16, and mesh openings of 1×2 inches or 2×4 inches. Smaller openings are generally better as they prevent paws from getting caught. Brands like Red Brand or Midwest Mesh offer reliable options. You can often find large rolls at hardware stores like Lowe's or The Home Depot, or specialty fencing suppliers.
- Hardware Cloth: Even finer mesh (like 1/2 inch or 1/4 inch) hardware cloth is also excellent, especially if you have very small dogs or are worried about small critters burrowing. It's typically more expensive per foot than welded wire, but extremely robust.
- Avoid: Chicken wire. It's too flimsy, rusts quickly, and a Husky can easily tear through it. Plastic mesh is also a no-go for these power diggers.
- Concrete: While more permanent and labor-intensive, pouring a concrete footer can be the ultimate solution. This involves digging a trench and pouring a concrete slab that extends both down and out. It's virtually indestructible but significantly more expensive and difficult to install yourself. This is usually considered for new fence installations or if you're dealing with a truly extreme digger and have the budget.
- Wood (Less Common, More Maintenance): Pressure-treated lumber can be used, creating a wooden "L" barrier. However, wood can rot over time, and a determined Husky might still chew through it or dig around a weakened section. It generally requires more maintenance and isn't as long-lasting as wire mesh or concrete when buried.
Consider the length of your fence line. You'll need enough material to go around the entire perimeter your Husky can access. It's always better to overbuy a little rather than run out halfway through. For a perimeter of, say, 150 feet, you'd want several rolls of mesh. You’ll also need galvanized hog rings or zip ties to attach the mesh to your existing fence, and possibly some rebar or stakes to hold the horizontal section flat before backfilling.
Tools You'll Need for the Job
Having the right tools will make this project much smoother and less physically demanding.
- Shovel or Trenching Tool: A good, sturdy digging shovel is essential. For longer fence lines, a manual trenching shovel (narrow blade) or even renting a powered trenching machine can save your back.
- Wire Cutters/Tin Snips: To cut the wire mesh to size. Heavy-duty ones are best for thicker gauges.
- Work Gloves: Protect your hands from blisters, sharp wire, and rough soil.
- Tape Measure: For accurate measuring of the mesh and trench depth/width.
- Marking Paint or String Line: To mark your trench line, ensuring it's straight and consistent.
- Level: To ensure your trench depth is relatively even.
- Zip Ties or Hog Ring Pliers & Rings: To securely attach the vertical mesh to your existing fence. Hog rings, properly crimped, offer a more permanent and durable attachment.
- Stakes or Rebar: To temporarily hold the horizontal 'L' section flat in the trench before backfilling, ensuring it doesn't curl up.
- Wheelbarrow: To move excavated dirt and new soil.
- Safety Glasses: Always protect your eyes when cutting wire.
- Utility Knife: If using landscape fabric under the mesh.
You can find most of these tools at local hardware stores. Remember, investing in quality tools, especially a good shovel and wire cutters, will make the job much less frustrating.
Assessing Your Existing Fence and Yard
Before you start digging, take a good, hard look at your current setup.
- Fence Type and Condition: What kind of fence do you have? Chain link, wood, vinyl? An L-footer can be adapted to most fence types. Assess its condition: Are there any existing weak spots, gaps, or areas where the fence is already lifted off the ground? Address these first. For example, a worn-out wooden fence might need repairs before an L-footer can be securely attached.
- Measurements: Measure the entire perimeter where your Husky might dig. This will determine how much material you need. Don't forget to account for gates! Gates are notorious weak spots, and you'll need to extend the L-footer across their openings or ensure a concrete threshold is in place.
- Terrain and Obstacles: Is your yard perfectly flat, or do you have slopes, uneven ground, or obstacles like large tree roots or buried utility lines?
- Slopes: On slopes, you'll need to ensure the footer follows the contour of the ground, maintaining a consistent depth. Terracing might be necessary on very steep inclines.
- Tree Roots: Digging near large trees can be tricky. You might need to carefully cut smaller roots or, in some cases, modify the L-footer design around major roots, ensuring it's still effective.
- Utility Lines: THIS IS CRITICAL. Before you dig anywhere, call 811 (or your local equivalent) to have utility lines marked. Hitting a gas line, electrical cable, or water pipe can be incredibly dangerous and expensive. Never skip this step.
- Soil Type: Sandy soil is easier to dig but can shift, potentially exposing parts of the footer. Clay soil is harder to dig but holds its shape better. Rocky soil is the most challenging, as you'll constantly encounter rocks that need to be removed.
- Access: Can you easily get tools and materials to all parts of your fence line?
A thorough assessment will help you anticipate challenges and adjust your plan, ensuring your L-footer is installed correctly and provides maximum protection for your wandering Husky. Knowing your yard's specifics can also help inform decisions about whether to tackle the project yourself or hire a professional, particularly for challenging terrain or very long fence lines.
Step-by-Step Installation of an L-Footer
Okay, planning is done, tools are ready, and you've called 811. Now it's time to get your hands dirty! Remember, this is about creating a solid, reliable barrier against your clever canine.
Preparing the Trench Along Your Fence Line
This is arguably the most labor-intensive part of the project, but crucial for success.
- Mark Your Line: Using marking paint or a string line, mark a straight line parallel to your fence, about 18-24 inches away from it. This will be the outer edge of your trench for the horizontal 'L' section.
- Start Digging: Begin digging a trench right along the base of your existing fence. The trench needs to be deep enough for the vertical part of your L-footer to be completely buried, typically 12-18 inches. The width of the trench should accommodate both the vertical drop and the horizontal extension. So, if your horizontal "L" is 18 inches wide, your trench needs to be at least that wide, plus a few inches for maneuvering the mesh.
- Create the 'L' Shape: As you dig, aim to create a trench that has a deeper section directly under the fence and then angles shallower as it extends outwards, or simply a flat bottom trench that is wide enough to lay the horizontal mesh at the desired depth. You want the bottom of your trench to be relatively flat and clear of major rocks or debris that could damage the mesh or create weak points.
- Remove Debris: As you dig, remove any large rocks, roots, or other obstructions. These can make it difficult to properly lay the mesh and create gaps that a persistent Husky might exploit.
- Manage the Dirt: Shovel the excavated dirt to one side, away from the immediate digging area, but close enough for easy backfilling later. A wheelbarrow can be a lifesaver here, especially for longer fence lines.
Taking your time with trench preparation will ensure a smooth installation of the mesh and a more effective barrier.
Securing the Vertical Section to the Existing Fence
Once your trench is ready, it's time to attach the L-footer mesh.
- Cut the Mesh: Unroll your chosen wire mesh and cut it into manageable sections. You'll need pieces long enough to cover several feet of fence at a time, allowing for some overlap at the seams. Each section should be wide enough to cover both the vertical depth (12-18 inches) and the horizontal extension (18-24 inches), plus a little extra for attachment and burying.
- Position the Mesh: Place the first section of mesh into the trench. The goal is to have one edge of the mesh extending upwards, flush against the bottom of your existing fence, reaching about 6-12 inches above ground level. The rest of the mesh will lie flat along the bottom of the trench, extending outwards.
- Attach to the Fence: Using your hog ring pliers and galvanized hog rings (or heavy-duty zip ties), securely attach the vertical portion of the mesh to the bottom of your existing fence. For chain-link fences, this is relatively easy – just thread the hog rings through the mesh and around the bottom wire of the chain link. For wooden fences, you might staple the mesh to the bottom rail or use screws with washers. The key is a tight, secure attachment that your Husky cannot pull away from the fence line.
- Overlap Sections: When you move to the next section of mesh, overlap the ends by at least 6 inches and secure them together with more hog rings or zip ties. This prevents any gaps where a Husky could squeeze through.
This vertical attachment is what creates the seamless transition from your fence to the buried barrier, leaving no gaps for escape.
Laying the Horizontal "L" Section Under the Ground
This is where the magic of the "L" shape comes into play.
- Flatten the Horizontal: Once the vertical section is securely attached to the fence and extending into the trench, the remaining width of the mesh should be laid flat along the bottom of the trench, extending outwards, away from the fence. This is your horizontal "L" section.
- Ensure Flatness: It's critical that this horizontal section lays as flat as possible against the bottom of the trench. If it curls up, a determined Husky might be able to dig under it. You can use stakes or pieces of rebar pushed through the mesh into the earth to hold it down temporarily.
- Check Depth: Double-check that the entire horizontal section is at the appropriate depth, generally 12-18 inches below the ground surface. This depth is vital for the psychological deterrent to work effectively.
Remember the specific lengths needed here. A standard recommendation for the horizontal portion is at least 18-24 inches outwards from the fence line. A tenacious digger like a Siberian Husky needs that extra width to truly convince them the path is blocked. This length makes it much harder for them to attempt digging beyond the footer.
Backfilling and Finishing the Installation
The final steps involve burying your hard work and making the area look neat again.
- Backfill the Trench: Carefully begin shoveling the excavated dirt back into the trench, covering the horizontal mesh and then the vertical mesh up to the original ground level. Take care not to dislodge the mesh as you backfill.
- Compact the Soil: As you backfill, periodically compact the soil. You can do this by walking over it or tamping it down with the back of your shovel. This helps to eliminate air pockets and create a firm, stable base, preventing the soil from settling too much later on, which could expose parts of the footer.
- Grade the Area: Once the trench is completely filled, grade the area so that it blends seamlessly with the rest of your yard. You might even want to add a thin layer of topsoil or grass seed to help it recover quickly.
- Test the Barrier: After the dirt has settled for a bit, take your Husky out on a leash and observe them near the newly installed L-footer. While you don't want to encourage digging, their natural curiosity might lead them to investigate. If they attempt to dig, they'll quickly encounter the barrier. This immediate feedback helps reinforce the effectiveness of your efforts.
Congratulations! You've installed an L-footer. This significant investment of time and effort will pay off by providing a much safer and more secure environment for your beloved Siberian Husky.
Maintaining Your L-Footer and Ongoing Husky Management
Installing an L-footer is a huge step, but it’s not a "set it and forget it" solution, especially with a breed as resourceful as a Siberian Husky. Regular checks and combining it with other management strategies will ensure long-term success.
Regular Inspections for Wear and Tear
Even the most robust L-footer can eventually succumb to the elements, persistent digging attempts, or general wear and tear. Make it a habit to regularly inspect your fence line.
- Weekly Perimeter Walk-Throughs: Take a walk around your fence perimeter at least once a week, preferably with your Husky on a leash. Look for any new "test digs" where your Husky might have attempted to breach the barrier.
- Check for Exposed Mesh: Over time, soil can erode or settle, potentially exposing parts of the mesh. If you see any sections of the L-footer peeking out, cover them with additional soil immediately and compact it.
- Inspect Connections: Check the points where the L-footer mesh is attached to your main fence. Are the hog rings or zip ties still secure? Has anything come loose? Huskies are strong, and if they find a loose spot, they'll pull at it.
- Look for Damage to the Mesh: While strong, the mesh can be damaged by lawnmowers, falling branches, or even persistent chewing if a spot becomes exposed. If you find any tears or bends, repair them promptly. Small holes can be patched with additional pieces of wire mesh and hog rings. Larger damaged sections might require cutting out and replacing a segment.
- Monitor for Frost Heave: In colder climates, the ground can freeze and thaw, causing frost heave, which might lift sections of the L-footer or create new gaps. Pay extra attention to inspections after significant freezes and thaws.
Being proactive with inspections and minor repairs will prevent small issues from becoming big problems, ensuring your Husky's containment remains secure.
Addressing Persistent Digging Attempts
Even with an L-footer, some Huskies, especially the highly motivated ones, might continue to try and dig. It's a deeply ingrained instinct, after all.
- Reinforce Stubborn Spots: If your Husky repeatedly attempts to dig in the same spot, despite the L-footer, you might need to reinforce that specific area. This could involve burying a second layer of mesh, or even placing large, flat stones or pavers on top of the buried L-footer in that particular section, just under the grass line, to add extra resistance.
- Environmental Enrichment: Redirect that digging energy! Provide safe, designated digging areas in your yard. A sandbox filled with sand or loose soil can be a great outlet. Bury toys or treats (perhaps from Ollie, a fresh dog food brand that Huskies often love) in it to encourage them to use that spot for digging, rather than the fence line.
- Increased Mental and Physical Stimulation: A tired Husky is a less destructive Husky. Ensure your dog is getting plenty of exercise appropriate for their age and health. This means vigorous runs, long walks, or even dog sports like Canicross or bikejoring. Mental stimulation is equally important: puzzle toys, training sessions, and even just regular outings to new places can burn off that excess mental energy that might otherwise be channeled into digging. For ideas on tiring out your Husky, consider Wearing Out a Siberian Husky Without Leaving the House.
- Supervision: Never leave your Husky unsupervised in the yard for extended periods, especially if they are known diggers or escape artists. Even with an L-footer, dedicated supervision is the best first line of defense. If you catch them trying to dig at the fence, redirect them to their designated digging spot or another engaging activity.
Combining With Other Containment Strategies
An L-footer is powerful, but it's part of a larger security system for your escape-artist Husky.
- Secure Gates: Gates are often the weakest point in any fence line. Ensure your gates are self-latching and have a strong, Husky-proof lock. Consider extending the L-footer across the gate opening underground, or installing a solid concrete threshold. Some Huskies can even learn to open latches, so child-proof locks or carabiners might be necessary. Check out Gate Locks a Siberian Husky Cannot Open for more tips.
- Tall Fencing: While an L-footer stops digging under, it doesn't stop climbing over. Siberian Huskies are surprisingly good climbers and jumpers. A minimum of a 6-foot fence is highly recommended, and even then, some determined Huskies can scale it. Coyote rollers (PVC pipes installed along the top of the fence) can prevent them from getting purchase to climb over. Learn more about The Six-Foot Fence a Siberian Husky Needs.
- ID and Microchipping: Despite your best efforts, escapes can still happen. Ensure your Husky is microchipped and that your contact information is up-to-date. A sturdy collar with an ID tag is also essential. GPS collars are another excellent investment, offering real-time tracking if your Husky does manage to get out.
- Pet Insurance: While not a direct containment strategy, consider pet insurance from providers like Healthy Paws. Should your Husky injure themselves during an escape attempt (e.g., getting hit by a car or cut on barbed wire), insurance can help cover the often astronomical veterinary costs. It's an important part of responsible Husky ownership, especially with their adventurous spirit.
- Training and Recall: A strong recall is invaluable, even if your Husky is never off-leash outside of a secure area. If they ever do get out, a reliable "come" command could be the difference between a safe return and a tragic loss. Consistent training, even for an independent breed like the Husky, is crucial.
By combining the physical barrier of an L-footer with diligent maintenance, appropriate enrichment, and other robust containment and safety measures, you can significantly reduce the risks associated with your Siberian Husky's natural instinct to dig and roam.
Common Pitfalls and Troubleshooting
Even with the best planning and execution, unforeseen challenges can arise. Huskies are masters of problem-solving, and they'll quickly test the limits of any new barrier. Knowing what to look out for and how to respond can save you a lot of stress.
When Your Husky Finds a Weak Spot
It’s almost a rite of passage for a Husky owner to watch their dog outsmart their latest containment effort. If your Husky manages to breach the L-footer, it’s rarely because the concept failed, but because there was a weak spot in the execution.
- Insufficient Depth or Width: The most common culprit is an L-footer that isn't deep enough or wide enough. If the vertical section only goes down 6 inches, or the horizontal only extends 6-8 inches, a truly motivated digger will learn to dig past it. Review the recommended depths (12-18 inches down, 18-24 inches out) and ensure your installation meets or exceeds these. If not, you might need to re-trench and extend the barrier in those specific areas.
- Gaps at Seams or Corners: Huskies are astute observers. If they find a poorly overlapped seam in the mesh, or a corner where the "L" isn't fully connected, they will exploit it. Go back and inspect all your seams and corners. Use extra hog rings or zip ties to reinforce any loose connections. A continuous, unbroken barrier is essential.
- Inadequate Attachment to the Fence: If the vertical mesh isn't tightly secured to your existing fence, they can pull it away, creating a gap. Ensure your hog rings are tightly crimped and numerous enough to prevent any give. For wooden fences, ensure screws and washers are used if staples aren't holding.
- Gates and Other Openings: As mentioned, gates are notorious. If the L-footer doesn't extend completely under the gate, or if there's a gap between the gate and the ground, your Husky will find it. Consider adding a solid concrete threshold under the gate or ensuring a continuous L-footer across the opening.
- Uneven Terrain: On sloped or very uneven ground, maintaining a consistent depth can be difficult. Areas where the L-footer naturally becomes shallower are prime targets. You might need to add more soil to raise the ground level, or add extra mesh depth in those specific spots.
Remember, your Husky isn't being "bad" or "stubborn" when they find a weak spot; they're simply being a Husky, driven by instinct. Your job is to be smarter and more persistent!
Dealing with Stubborn Diggers
Some Huskies are just more determined than others. If your dog continues to be a persistent digger despite a well-installed L-footer, you might need to employ some advanced tactics or seek professional help.
- Layering Barriers: For a truly tenacious digger, consider layering. You could have your primary L-footer, and then a foot or two inside that, create a secondary, shallower buried wire barrier. This creates an even wider "no-dig" zone.
- Visual Deterrents: While the L-footer works underground, sometimes a visual deterrent can help. Placing thorny bushes (like roses or barberry – ensure they're pet-safe if ingested!) along the outside of the fence line, just above where the L-footer extends, can make the area less appealing for digging and lounging.
- Professional Consultation: If you're at your wit's end, don't hesitate to reach out to a professional dog trainer or a canine behaviorist experienced with Huskies. They can assess your specific situation, observe your dog's behavior, and offer tailored advice. They might identify underlying behavioral issues (like extreme anxiety or resource guarding) that contribute to the digging and suggest training modifications or additional enrichment strategies. For example, a trainer might help you find new ways to provide mental stimulation, which is vital for an intelligent breed. Even a simple change in routine or adding specific training commands could make a difference in their overall contentment and reduce the urge to dig.
- Designated Digging Area: Re-emphasize and enhance your designated digging area. Make it super appealing! Bury high-value treats from a brand like Ollie that uses fresh, human-grade ingredients, or a favorite toy. Make it the only place where digging is rewarded and praised. This helps redirect that natural instinct to a safe, acceptable spot.
Seasonal Considerations and Ground Changes
The ground isn't static, and environmental changes throughout the year can impact your L-footer's effectiveness.
- Winter and Frost Heave: In regions with freezing winters, frost heave can be a significant issue. As water in the soil freezes and expands, it can push the ground (and anything buried in it, including your L-footer) upwards. When it thaws, it settles back down, often unevenly, creating gaps. After the winter thaw, perform a thorough inspection of your L-footer to check for any exposed sections or new weaknesses. You might need to add soil or compact existing soil to fill in any new depressions.
- Heavy Rains and Erosion: Prolonged periods of heavy rain can lead to soil erosion, particularly on slopes or in areas with loose soil. This can wash away the top layer of dirt, exposing your buried L-footer. If you live in an area prone to erosion, consider planting ground cover or adding a layer of mulch over the L-footer area to help stabilize the soil. Ensuring proper drainage in your yard can also mitigate erosion.
- Drought Conditions: During droughts, the ground can become extremely hard and cracked. While this might make digging more difficult for your Husky, the cracks can also reveal weaknesses in the barrier, or they might try to exploit areas where the ground has pulled away from the fence.
- Vegetation Growth: Over time, weeds and other plants will grow over the buried L-footer. While this is generally good for aesthetics and soil stability, occasionally check that no strong roots are pushing against the mesh or that dense vegetation isn't obscuring a digging attempt.
Being aware of these seasonal changes will help you anticipate potential problems and perform preventative maintenance, ensuring your L-footer remains a strong and reliable barrier against your Siberian Husky's determined digging exploits year-round.
Disclaimer
This guide offers comprehensive advice based on general knowledge and best practices for Siberian Husky care. However, every dog is an individual, and specific situations may vary. It is always recommended to consult with a professional dog trainer, veterinarian, or canine behaviorist for personalized advice regarding your dog's health and behavior. The information provided herein is for educational purposes only and should not replace professional consultation.